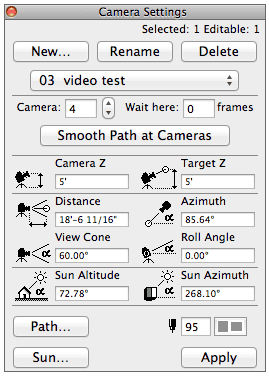
I’d been meaning to record a video on the basics of making a movie from ArchiCAD for a long time. Yesterday a former colleague and friend was asking where she could find such a video to teach her how to make a quick fly-through movie in ArchiCAD… 24 hours later… here’s the video on Cameras and Camera Paths in ArchiCAD. As always, I’m sure I didn’t cover everything. If you have any questions, leave them in the comments here, or on YouTube. I’ll do my best to answer them, maybe with a follow up video if that makes sense. Also it’s worth noting that what I cover regarding Cameras is useful for many other things beside making movies. But that’s for another post.
Making a Movie from ArchiCAD
Some things I forgot to mention in the video
If you need to add a camera between two existing cameras, select the camera BEFORE the one you want to add in the camera settings. Then when you add a new camera it’ll show up after the camera selected. So for instance if you want to add a camera between cameras 4 and 5, select camera 4 in the camera settings before you create the new camera. The new camera will now be camera 5 and the old 5 will be 6. Clear as mud? Sorry I forgot to cover that in the video.
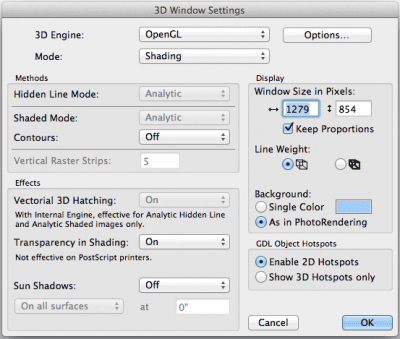
If you want the background of your 3D window to show an image like in the video I showed, go to the 3D window settings, and set the background to “As in PhotoRendering”. And then in the PhotoRendering settings, select a jpg or other image file for the background.
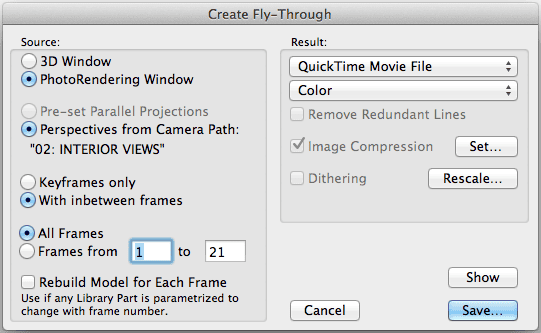
If you want to make a video using the PhotoRendering Window, setup what you want in the PhotoRendering Settings (whether the Internal Rendering Engine, Lightworks, or the Sketch Rendering Engine), and then select PhotoRendering Window in the Fly Through settings.
Example Results
Here’s the fly-through of the church project I used as an example. You might remember that project from David Jefferis’ guest post on an alternative to photorealistic renderings. As you can see, we chose to do avoid photorealism with both deliverables; but each supported the other in the overall package. There are a lot of ways to get more realism from a movie straight out of ArchiCAD, but this is a great start and a perfect workhorse for much of your 4D needs (if you’re not using BIMx and it’s limited path capabilities).
Need more help with Cameras? Start here. Or ask me some questions.
For even more ArchiCAD goodness, make sure to follow Shoegnome on Facebook, Twitter, and Youtube.


38 thoughts on “The Basics of making a Movie from ArchiCAD”
Thanks Jared, this was very helpful.
Great video Jared!
To place cameras directly from the 3D window you can show the 3D visualization toolbar (Windows/Toolbar/3D visualization) and click the tiny arrow next to the 3D Projection Settings-button ‘Put a camera into the path’ (fourth from the left)
Thanks. Didn’t know about that button. That toolbar has a lot of nice features for cameras. I’ll need to explore that more. Maybe write another post!
Also, you can right click in the project map on the camera path and select ‘Save Current Projection’, it’ll put a camera after the last clicked camera. So if you go to camera 2, move your view in the 3D window, then right click in the project map you’ll add a camera 3.
Thanks for posting this, Jared!
I didn’t know you could set the camera from within the 3D window, very nice time saver.
So, once you are finished, is the best way to hide the placed cameras and paths to create a new set without cameras placed?
Thanks,
Chris Sparks
Chris, yeah that’s what I do to hide cameras. I feel like there must be another way that’s as quick (and not a work around), but I’m not sure what that other solution is. Glad you enjoyed the post.
Hi Jared –
Nice work, as usual.
Re hiding cameras, the “official” way to do this is to click the Path… button then from the Display Options popup menu choose None. If you later click to place a camera down on the plan, the display options will automatically change to show all the cameras in the current path. It’s actually not as quick as what you’re doing.
Eric
Eric, thanks. Yeah it’s unfortunate that the “official” way is so much slower. When we used to have multiple camera types (what was there 3: the VR dome, something else, and the traditional camera), I used to just switch to one of the other types in the tool. And then I’d see nothing. Also a work around, but fast and no need to create a dummy path. I never used the other camera types, but I liked them for the ability to easily hide the cameras on a path!
I have found the movies take a great deal if processing so the alternative is to create a movie in BIMX and capture off screen using a programme like Snagit. I find the BIMX movie more intuitive because you just decide where to go in the model and the route is recorded for later playback.
Keep up the great work.
Tim, thanks. I’ve heard some really good things about people doing a similar solution. Something else to think about, not sure if it adds value or not. If you save a camera path in ArchiCAD, it’ll show up in BIMx, so you could create the path in archicad, run it in BIMx, and record that. Some links. Best of both worlds, maybe?
we’re MAC users and somewhere around AC 15 version, the movie function stopped working. Once saved, AC appears to create a Quicktime Movie as usual, actually saves a small (like 1kb) file with correct icon, and then will not run in Quicktime. We were forced to purchase BIMX for AC 16 to have any capability of saving movies. Evidently AC 17 will now include BIMX. That was a very expensive temp fix.
Brandt, that is very strange. Have you talked to the tech support guys about this? I use ArchiCAD on a MAC and haven’t seen this issue. So my guess is that there is something else going on. Maybe another program interfering with ArchiCAD? Or perhaps the OS? I’d definitely recommend talking to tech support.
Jared,
Thanks for the reply.
I’ll try tech support again–called previously and problem could not be resolved. Just tried a quick test again in AC 16–this time it made a .mov file that seems to contain content (11Mb), but same error message when trying to play with Quicktime 7: “Movie could not be opened; the file is not a movie file”. Older movies open fine. So would not appear to be an OS Lion issue. ONly anomaly I see when comparing “Info” boxes of working files vs non-working is under “more info. Only info listed on these non-working files is “Last opened”; while the working files show “dimensions:” “Codecs”, Duration, Authors, Copyright, Movie information.
That is really weird. The good news is that I’m 100% confident the issue is something local to your specific machine(s) and setup. The bad news is that I’m 100% confident that there’s something odd going on with your machines…. hopefully that means it’s resolvable. Have you searched around the archicad-talk forum for someone with a similar situation? I wouldn’t be surprised if it’s been discussed there. Or perhaps in more general non-archicad terms elsewhere.
Hello.
I put a background image on my photorendering settings, but this image won’t cover the whole 3d view background, I tried to solve this by changing the resolution, but it didn’t work, does any one know how can I make the picture fit in my whole 3d window?.
Best regards.
Ana
Ana, you need to either make the image bigger (outside of ArchiCAD) or change the magnification of the image. Under PhotoRendering Settings/Background you’ll find the increase magnification option. Likewise, you could decrease the resolution in the same tab. It’s not the greatest solution or easiest to finesse.
I was wondering if you already made a walk thru with the new render engine. The new engine is create but comes with new challenges. I make interior movies and there appear blinking spots al over the place. Do you know how to solve that problem?
I have made one video using the new Cinerender engine. You can view it here, if you want. I didn’t have any troubles though, so I’m not sure what might be causing your issue.
The disco ball effect only happens in the interior fly-thru videos. I couldn’t figure out what causes it, accept maybe the lights regenerate different light patterns each time it’s rendered. It’s very annoying.
How do I make the resulting clip slow slower
When setting up the cameras and video remember frames/frame rate = length. So to increase the length of the movie you need to increase the number of frames and/or decrease the frame rate. So if you have 800 frames at 8 frames/second, then you have 800 f/8 f/s = 100 second movie.
The other solution would be to slow the video down after the fact using editing software. I’m sure iMovie, etc. could do that fairly easily. Maybe even the YouTube tools? Not sure.
other notes – set the frames between cameras and how many frames the video sits at a camera under the path options of the camera settings. Set the frame rate when you select create fly through. The default is 10. 8 is okay. More really isn’t necessary, less might get jittery.
Hi Jared,
Sorry to respond to such an old thread, but I am wondering if you can touch on if it is possible (and if so, how to accomplish it) to have your doors automatically open as you “walk through” them in your fly through?
Thanks so much!
I’m not aware of a way to make that happen. I cheat by opening the doors beforehand in the model for doors I need to walk through. (and no worries about commenting on old posts, I’m glad they are still getting traffic and being of use!)
Betsy –
ArchiCAD library parts may be programmed to have different locations or parameter values based on fly-through animation frame numbers. It is not something built into standard Graphisoft library parts, however I have programmed this for clients in years past, and there were some car objects sold by third parties that had this built-in (so you could have a car driving by during the animation, starting at a particular frame and moving from position 1 to position 2 over a series of frames). It’s unfortunately not a simple exercise, since it involves GDL programming and isn’t visual, but it is possible. A more straightforward approach is to do object animations (doors opening, cars driving by, etc.) in a visualization program such as Artlantis Studio, which has a time-line interface that makes it easier to set up, test and fine-tune. If you want to do this type of animation in ArchiCAD directly, you may consider getting some consulting assistance (or purchasing some pre-made objects) from a GDL developer such as Master Script (Jeroen de Bruin in the Netherlands) or CadSwift (Kristian Bursell from Australia).
Thanks so much Jared and Eric – I will use Jared’s cheat for now, although getting into GDL is definitely on our firm’s to-do list!
hello , i would like to ask how can i put cameras around an object (a chair) and make it look like the object revolves around itself and it doesn’t appear higher or lower or further from frame to frame. Do i have to keep some numbers on camera settings fixed (such as camera z, target z…..) and if yes which ones stay the same and which ones have to alter?
here’s how to do it:
1) draw a circle with the center of the circle on the object you want to circle around.
2) place cameras along the circle, with their focus being on the center of the circle.
3) place the last camera on top of the first camera.
4) adjust the path to follow the curve of the circle.
5) create the video.
The Z for the camera/target should be constant, but could change if you want that effect. This is very easy to set up and play around with to find the exact effect you want. You could even have the cameras spiral up or down, as long as the distance from the object is maintained (radius of the circle) and the path follows the curve in plan.
A few suggestions to make this process a little easier:
1) Place the first camera at the desired location and make sure the focus point (the small bubble that you’re looking at is exactly snapped onto the center of the object. Select that camera and go to 3D and verify that you like the distance, cone of vision framing and elevation of the view. If it needs adjustment, it’s easiest if you do this on plan, maintaining the center point, and check the 3D view again until you’re satisfied.
2) Select this camera and use the Multiply command and choose Rotate Copies with the option to set the first and last point and allow ArchiCAD to determine the in-between locations. Choose at least 4 copies. Click OK then click the center point, the camera vertex point, then gesture with your mouse in a circular motion to guide ArchiCAD around in a circle, and then click on the vertex point again. This will make multiple, evenly spaced cameras.
3) Select all of these cameras, and use the command to Smooth Path at Selected Cameras, which will make the patch perfectly circular and evenly paced. (Doing this manually as in Jared’s step 4 is hard to make perfect.) This command is available I think in the context menu; possibly in the View menu > Navigation Extras (I don’t have ArchiCAD open at the moment, so I’m not sure).
Anyway, you can then experiment with how many in-between frames you create; because your path is perfectly circular and smoothed out, it should work nicely for any reasonable number of frames…
Eric
Great stuff, man! Thanks again for freely sharing your knowledge. It means a lot!
Hi.
I’m trying to make a animation, have put up all of the cameras and high as i should, but when i try to make a fly-trough out of it..it just goes in to 3D and show the building from above on the outside ( the cameras are placed on the inside) and wont let me make a movie out of the cameras that i have put up, only makes a 1 second movie of the outside.
Any suggestion on what i can do to make it go the path that i have made for it? using archicad 19.
Thanks 🙂
It sounds like the movie is being made with a different set of cameras. Make sure when you create the movie, the camera path you want is selected in the dialog box.
Thanks for replaying! I’m making a new camera i the camera options when i was starting. Have tried it a couple of times but i wouldnt change. is it a another dialog box?
– L
Check the dialog boxes described in the post above.
I would like to know, it I stopped the saving of my movie (which it taking forever) before it was done. Would it be completely useless or would it save it to the part where I stopped it? Why does Archicad 20 seem so much slower than 19?
I believe you should be able to chop the movie and use just what was saved before you cancelled. Easy enough to find out, right? As for speed…I haven’t noticed ARCHICAD 20 being slower, but I have heard this complaint from others. I’d search on the ARCHICAD-talk forum for others who have this issue. My suspicion though is that in AC20 people are just using more detailed settings so it’s taking longer because the result is higher quality. But that’s just a guess.
Hey Jared, long time no see. Hope things are well.
I’m having issues with inserting a camera between existing cameras in the path. It keeps sending it to the end of the path. Just as you stated in your “things I forgot to mention,” I select the camera I want to place it after, go to the camera tool and place a camera, but it still throws it at the end. I also found the YouTube video below which addresses this specific issue, but it’s not working. Any thoughts?
https://www.youtube.com/watch?v=mh4YL6NqTs8
Hey! Good to hear from you. It looks like they’ve changed how adding cameras works since I did this video. The best solution I’ve found to this problem is as follows:
1) select the camera on plan that you want your new camera to come after.
2) drag a copy of the camera in plan.
3) the newly created camera will appear after the original camera.
4) update the new camera however you want.
5) repeat as necessary to add new cameras after any existing camera.
how do i make objects like cars to move, doors to open?
In ARCHICAD you can’t open doors during movies. I either just have the camera move through the doors or have the doors open in the 3D model to begin with. Some objects can move with each frame (like cars or objects that always face the camera), but not doors. Off hand, I don’t know which objects do this. I’m sure if you ask or search here: http://archicad-talk.graphisoft.com you’ll find what you’re looking for. Once you find these Objects, make sure the model rebuilds with each frame during the movie making process.