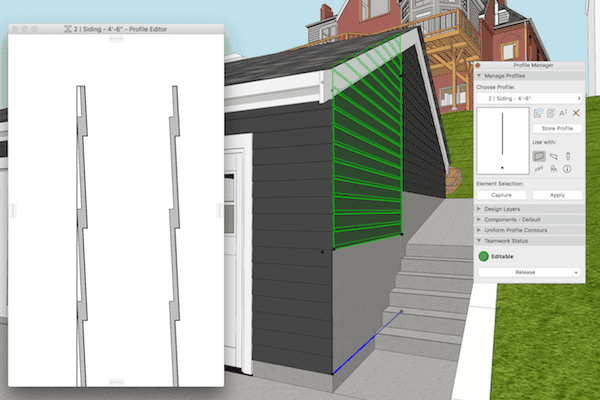
When working with Complex Profiles in ARCHICAD, it’s important to remove jogs that would otherwise result in unnecessary polygons and shadows. I came across an instance of this today and recorded a video on the fastest way to fill in gaps in complex profiles (and other oddly shaped elements in ARCHICAD). This technique isn’t hard or very useful. But when it matters, it’s very important as it turns a tedious task into a very quick fix. And it’s the accumulation of little tricks like this that allows us to make pretty and fast models.
For more on how and why I do siding the way I do, check out this post and video.
Subscribe to my blog to read more about the tricky world of being an Architect in the 21st century. Follow Shoegnome on Facebook, Twitter, Instagram, and Youtube. If you have questions about the Shoegnome Open Template or need older versions of the template (ARCHICAD 16 and newer), check out the FAQ.

11 thoughts on “Model Speed, Complex Profiles, adding Fills, and a Quick Video”
No Plines but regular lines are available.
True. But I figure doing this technique with fills is faster because they are easier to select and delete afterwards.
Tomato/tomahto
—
Shift+L (line shortcut)
Shift+A
Del
—-
Different since you cannot use the filter by tool with the Fills in this case
You always have the good answers! Here’s my excuse/response to that: there is no default Line Tool shortcut. And I don’t add one because I never use the Line Tool (unless forced to by the Complex Profile Manager). Therefore I can’t do that technique with shortcuts alone, and that’s why I never thought of it!
But for those following along, Shift+A to select all of any Tool type is super useful.
I do agree that using a Fill might be easier on this case and I did change my shortcut for Line because of you (L is now for Plines).
I think L for Polyline is the only shortcut I override OOTB. L OOTB is guideline, which is foolish.
Hey Jared, Thanks for the refresher on this. Quick question:
Do you ever find that it lap siding will give you a hard time cleaning up in 3D? Often times I simply associate the lap siding with the entire assembly and set it to “Finish”, or at the very least I will have a material behind it to represent a furring strip. It is making me crazy as there does not seem to be a any rhyme or reason as to what cleans up and what does not. IE the top of the wall is all screwed up and the bottom is fine.
Thanks again for the all the great work!
Your lap siding problems should go away if you separate the lap siding from the rest of the wall. Your problems arise from having the Complex Profile wall doing too much. CPs with lots of jogs in section will often have problems at corners and at Window/Door openings. My hunch is that your CP walls also have trim or footings or something else that sticks out farther than everything else. ARCHICAD’s intelligence to resolve corner conditions is fairly narrow and can get confused if there are multiple logical answers.
Which is all a way of saying, keep your elements simple. Lap siding needs a different logic than the assembly behind it and thus should be a different element.
Interesting… I’ve been modeling my assemblies this way for years with no problems. Adding the fills of airspace behind the siding makes it go wonky otherwise it’s clean.
Thanks for posting this Jared,
I know its a old video but I have been wondering how you work with windows when doing these complex profile skins? I am using window openings and placing them manually to match the window in the wall behind but this leads to problems with keeping the model updated as well as making sure they are not scheduled on the window schedule by mistake. It also is a issue when a window spans two floors and thus has to have a cut out of each of the two skins. What have you found to be your best practice for dealing with these?
Here’s an earlier video I did that covers the basics of this technique: https://shoegnome.com/2014/01/08/archicad-video-complex-profile-siding/
I use empty openings in the skin like you do. If a window spaces two stories, the siding skin is a non-issue because the skin covers the entire face of the elevation. If the wall the window lives in can’t span two stories, I’ll either have the window pop above the wall and place an empty opening in the wall above or do empty openings in both the lower and upper walls. I’ll then place the window in a 3rd wall that is just the size of the window and sits in the openings created in the other walls. In short there’s not one solution.
To prevent the empty openings from being in the schedule is easy. You just need to set up your schedule by criteria to exclude the empty openings. A couple of solutions:
1) criteria by layer (only exterior wall layer and foundation layer; siding layer is thus excluded)
2) criteria by ID (exclude elements with ID set to OFF / HIDE / whatever you want.
3) criteria by ARCHICAD properties. This is my prefered method. Only elements set to window or door classification + exterior position show up. Empty openings are left unclassified. This works beautifully and also makes it very easy to add or exclude elements from the schedule. I also have a ‘hide/show on schedule’ property in case an element meets all the criteria but still needs to be excluded.